Monday, October 22, 2018

iPhone XR: New Colourful iPhone Opens for Pre-Order

iPhone XR: Why the cheapest iPhone Yet maybe Worth more the Wait

As you’ll must have heard, unless you’re living under a rock, Apple has recently released its new iPhone line up and while the iPhone XS and XS Max maybe be great phones all on their own, today we’ll be looking at the iPhone XR and why it maybe the one for you. If you’re in the house for an iPhone and have waited long and patiently for a new phone then the iPhone XS or the XS max could be the ones for you. But if you’re an old iPhone user or have used the iPhone X then these versions are just a small upgrade and you might want to wait for the better priced iPhone XR before you make a purchasing decision.

Looking at the Specs on the iPhone XR:

Apple has decided to put the same A12 bionic processor into all iPhone XR, XS(not for extra small) and XS max. This is the same as last year when Apple released its new lineup of phones that too had the same processor running on all of them.

The main difference is when it comes to Advance LTE which the iphone XR does not have, which is not really a big thing other than internet speeds will be a little lower than this year’s pricier models.

Let’s look at the camera on the iPhone XR: 


The camera is almost the same on the iPhone XR but has a few differences. There’s only one 12MP camera on the back of the iPhone much like what was on the iPhone 8. This means that you won’t get 2x the optical or digital zoom when you take a pic.

iPhone XR will have a different kind of portrait mode. In the normal portrait mode iPhones have dual
camera, one that blurs the background while the other sharpens the foreground. But with the advancements in Apple’s A12 bionic chip the iPhone XR will be able to take a picture in portrait mode with just one rear facing camera.

iPhone XR

Like this year’s Lineup: 


The Apple iPhone XR will have much of the same features that are present in the iPhone XS and XS Max, like dual sim and a glass backing. But unlike the iPhone XS and XS Max, the iPhone XR will be made from aluminum (I mean the non- glass parts) instead of steel.

The iPhone XR will not have 3D touch too. But don’t be too disappointed, the Apple iPhone XR will still have some haptic touch sensors, making it, not a total loss.

Battery Life on the Apple iPhone XR: 


The iPhone XR maybe worth it just for the battery if you know what I mean and if you don’t….Well the iPhone XR has 15 hours of internet usage and 16 hours of video playback which is the best we have seen in an iPhone to date.

Colors and price of the iPhone XR: 


You’ll get this iPhone with a lot more color options and this budget iPhone is supposed to retail for a starting price of $749.

Wednesday, October 17, 2018

How to Use Wi-Fi in Airplane Mode on iPhone

Wi-Fi in Airplane Mode on iPhone
Most of the people always do like to access WI-FI on fights, but they often can't do that because they still keep their devices in Airplane mode. So, people always check " how to use Wi-Fi in Airplane mode" to get a solution.

If you are one of them, then don't worry we got you covered.

Here in this article, we'll look at how to use Wi-Fi in airplane mode on iPhone. We'll also include the step by step process to access Wi-Fi when you aboard the plan.

If you grab an iPhone or Android phone you will often see the airplane mode option in quick settings. Most of you might probably know about the airplane mode but if you don't know about that means don't worry we got you covered.

What is Airplane mode? 


Airplane mode is available on almost all smartphones, laptops and other similar smart devices. whenever you activate the airplane mode all your phone or device signal transmission will go offline.
After activating on your device you will often see the airplane icon in your phone's status bar and in laptops menu bar as well.

This feature is called as the Airplane mode, we are using this mode mainly in flights because some airlines prohibit wireless devices on their planes. They often say that phone signals could interface with radio equipment.

Now, let's see what does airplane mode will actually do.

What does Airplane mode do: 


Airplane mode will simply disable all your wireless connections and go offline. by activating airplane mode you cant do following aspects.
  • Call & Texts: You can't make calls or text messages in your phone.
  • Mobile data: You can't even access mobile data in the Airplane mode.
  • Wi-Fi: You phone will not be connected to any Wi-Fi-connections.
  • Bluetooth: Although Bluetooth is short range connection it also disables Bluetooth connection as well.
So these all things you can’t do in your mobile when you have activated airplane mode. now, as we are speaking about the iPhone, it is also having Airplane mode. It acts same as I have explained above.

Anyways, in modern days flights are having in-flight Wi-Fi option which won't have catastrophic effects on radio signals.

Some people always strive to save their battery life, so they often keep their phone in Airplane mode. Now, here comes some questions.

Most of the people often ask me

Does airplane mode save battery?

To be frank, this is a simple answer yes it can save battery. Airplane mode definitely helps your device, and it can save your battery life.

The power consumption actually depends upon the model of the phone. In general, the various radio signals in your cell phone take up a lot of power. Also, the app notifications over the Wi-Fi network will also slowly drain your battery. Communicating with cell towers and using Bluetooth is also the power consumption process. So, for this reasons, most of the people always keep their phone in Flight mode.

Generally disabling all these services will keep your phone alive for lots of hours. Because your phone will not have much action in airplane mode, it will save power.

Apart from that, the best part is it charges faster than standard devices.

As the questions are completed let's get into the topic “ how to use Wi-Fi in Airplane mode on iPhone”.

Let's get into the topic:
Wi-Fi in Airplane Mode on iPhone

How to use Wi-Fi in Airplane mode on iPhone: 


To use Wi-Fi in airplane mode on iPhone you have to follow the below-mentioned steps. With these steps, you can quickly turn access the Wi-Fi on Airplane mode.

Now if you need help in turning on the Airplane mode in iPhone means don't worry follow the steps.

How to turn on Airplane mode in iPhone: 


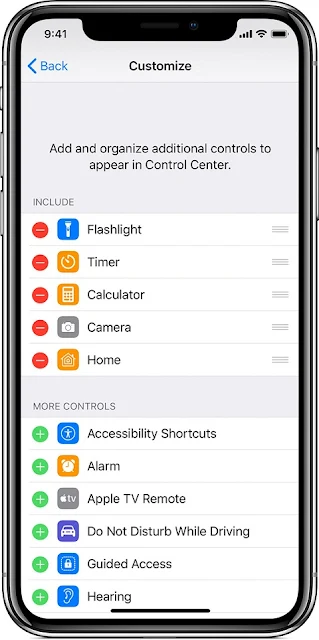
To quickly turn on Airplane mode in iPhone, iPad, or iPod touch you have to open control center.

Control Center

Process One:

  • Open the control center.
  • Then click on Airplane symbol.

Process two:

  • Go to the settings > click on Airplane Mode > turn it on.
If you are using Apple watch means you can use these settings.
  • You have to touch and hold the bottom of the Apple watch screen until you see the Control center.
  • Then swipe the control panel option up.
  • Finally, tap on Airplane mode option.
  • Or you can go to settings >> Airplane mode.

Now let's get into the final option how to use Wi-Fi in Airplane mode: 


To use Wi-Fi in airplane mode you have to follow these steps.

customize control center
  • Firstly, head over to the settings tab
  • Then activate the “Airplane mode”
  • Click on Wi-Fi and if it off then activate it by tapping on.
  • Then select your Wi-Fi network.
With these setting changes, you can quickly access Wi-Fi in Airplane mode as well. You can even use Bluetooth as well. Same like the above process you can use Bluetooth option.

In the new IOS 12 devices, it gives you a reminder that Airplane mode is activated and it is on use by graying out both the personal hotspot and cellular settings.

Conclusion: 


This is all about the “how to use Wi-Fi in Airplane mode on iPhone”. If you have any queries on this topic then you can let us know in the comments section below.
< /div>

Tuesday, October 16, 2018

Apple MacOS Mojave Review - Macmyth.com

MacOS Mojave Review
Do you feel like your tired and your eyes are stressed due to the heavy workload you are doing on your mac? Then the new update from MacOS will definitely fill joy in you as it has improved its performance and brought most potent features which can help you to do work for longer periods. The new update is Mojave, and in this post, we are all set to go for MacOS Mojave Review.

From Past few years, I have been watching out all the useful updates which are rolled out by iPhone and soon think that there may be another update rolled out for Mac users but I was proved wrong every time. And at some stage, I was wondering Why Apple is only focusing on iPhones Rather than Mac Users.

But, now the real-time upgrade has come to the MacOS as well. This new update of MacOS is called as Mojave. It has some powerful and cool features which are helpful for all Mac users. If you are, Mac users mean you will definitely love this update because it is having better features than older versions.

As we are focusing on MacOS Mojave Review, I’ll be covering all the topics, features and real pros and cons of this latest version of MacOS.

So, let's get into the MacOS Mojave Review.

MacOS Mojave Review: 


Mojave is the latest version of MacOS, and it's available for all Mac users. Now, most of you might be wondering whether to download this Mojave OS or not?

If you are one of them then don't worry after reading this MacOS Mojave Review you will have a clear picture of this OS and you will know the ins and outs of this OS as well.

Mojave Release Date and Overview: 


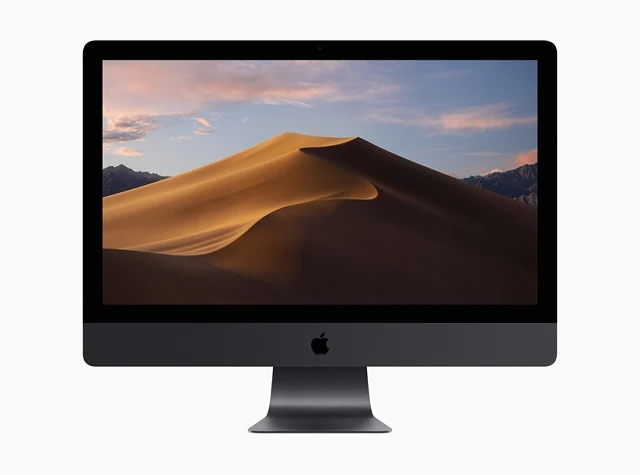
This latest MacOS Mojave is a free update which has arrived on September 24th. In this Mojave, OS apple is mainly highlighting two features one is the Dark Mode feature which will help you work effectively for long periods without affecting our eyes.

The second feature is its Dynamic Desktop features which let your desktop image to change according to the time of the day. Apart from these, you can also see the internal improvement which enhanced the performance of the system. The Galler view in the finder and flexible screenshots are the other important features which you can speak about.

So, lets straightly go into the Features and modes of MacOS Mojave Review.

MacOS Mojave Dark Mode: 


MacOS Mojave Dark Mode
When the Mojave OS has arrived the most exciting feature which users are awaited for is its Dark Mode. The new and exciting look of MacOS mutes the colors of the regular menus and its interface so that you can work all the day without any stress or strain to your eyes. This is one of the best features of the new MacOS Mojave and in fact, Apple has offered a true Dark mode on Mac for the first time.

Although there used to be an option of turning to the night shift in previous versions of Mac it would turn down to the blue light in the evening and later dock dark menu. But, Now with new Dark Mode, Mac users are able to darken every element on the system’s interface.

You can just do that with going to System Preferences > General > Dark. By this, you can go to dark mode. When you click on that the menu and other interfaces you will change their total appearance to dark color.

Whenever you click on the Dark option, the entire system workspace will turn into the dark interface, and it will even change the other elements appearance as well. Even safari turns into the dark mode, but web pages will not switch because website owners dictate their presence.

If you are feeling uncomfortable with the normal mode, then you can quickly switch to this impressive Dark mode which protects your eyes and lower your stress. With this feature, Apple has moved a step forward in safeguarding long computer users experience. In this Dark mode version even messages, notes, and backgrounds will become dark, but its text will be white so that you can read properly. So, it is one of the best and creative features in the MacOS Mojave

New Feature of MacOS Mojave “Desktop Stacks”: 


The new desktop stacks is another new additional feature in MacOS Mojave. Once you have completed using and enjoying the Dark Mode you can enjoy Desktop stacks feature as well. Over the past few version, Apple has tried different things to refine spotlight which allows us to tag documents. So that we can quickly preview the file before opening it along with that, it also has made smart folders so that certain types of files can be easily located.

Now, with the help of its previous versions, Apple has recognized that most of us are saving something on the desktop. So, in Sierra, it has added the ability to sync the desktop to the icloud and helped us to access it from any Mac or IOS devices very simply.

Apple has newly updated that version and brought new Desktop stacks feature to create smart folders on your desktop automatically. These created folders can automatically be sorted according to the Date Added, Date modified, File type, tags, Date last opened and more.

When this new feature is turned on means, you can quickly sort all the files on your desktop into a clear structure and folders. This will be very useful for all the people who save their work on their desktop for easy accessing of files.

Now, if you want to open this feature means you have to follow these steps:


  • Go to the Finder Menu.
  • Click on View > Then click on Use Stacks.
  • When you turn on the “USE stacks.”
  • The desktop will be clean and divided into the folders.
  • In that, you can select types such as “Date Last Opened,” “Date Added,” “ Date Created,” “tags” etc. 
  •  
    While using this feature, we found that last opened is the best option to access the critical file we need quickly. And it will make more comfortable for you to access your used work. In this new MacOS you can click on the stack then all contents will appear on your desktop to make life easier for you. You can quickly select the file you want to access without any hassle. 

    Mark up and Finder: 


    When you are having a glance at new features in Mojave, then markup and finder is the other best option you have to watch out for in new OS. This new feature is nothing but the joining of two features in previous versions.

    Those two features are quick look and markup tools. Here Quick look is one of feature which helps you have a glance at the file without even option. It simply generates the preview but you have to press the space bar for that in older versions, and in markup tools, you can edit PDFs and Email attachments.

    Now, these tools have combinedly came into the new Mojave OS. In this new feature when you hover your mouse over the file, you can get to know about the file with preview and metadata associated to the file. Along with these, you can also quickly edit these documents and files in your desired way.

    Improved Screenshots and Videos Editing Options: 


    MacOS Mojave Screenshot option
    With the new feature in MacOS Mojave, taking screenshots and videos are much easier. With the help of the markup tool, you can quickly edit the screenshot you take. Usually, in Mojave, the screenshot you take are shrunk to a thumbnail in the bottom right you can quickly access those and edit those screenshots.

    Unlike previous OS you won't have to open the file and then open image editor to crop or do add changes for the screenshots you can edit or draw on the screenshot without any hassle.once you completed your editing you can simply hit save or share button on your MacOS.

    Similar to the screenshots the videos get process is also the same. Previously we used to record video at that time was necessary to fire up Quicktime and then record the screen. But in new Mojave, this feature is automatically included so you can record entire screen or you can record selected portion as well.

    New APP Improvements in Facetime Ground Video Chat Especially in MacOS Mojave: 


    The new MacOS Mojave has further improvements in APPs as well. The new Facetime group calling app is introduced in the facetime app. With this new feature, you can group video chat with up to 32 people. Although this feature is yet to roll for regular users, the beta tester can use this feature.

    Best Continuity feature to never stop the workflow: 


    Along with this, you can also see the new continuity feature has arrived in Mojave as well. The continuity feature will bring the iPad, iPhone, and other Mac devices together. Here the ability to bring together means the ability to receive messages or take phone calls and another handoff features from one device to another device. So, that you can simply continue your incomplete office works in your home mac without stopping your workflow.

    You can even use iPhone as the capture device. Just you have to right click on the area where you want to add the image, and you have to choose the options to take the photo that’s it. Apart from these, there are a lot more in this device.

    Enhanced News app: 


    While using the news app in MacOS Mojave, we found that this app will import all your existing settings from your iPhone so that you can view all your desired topics stories from Apple news on your Mac device. Along with that, the new news apps is also combating with the fake news similar to the google as well.

    Improved web Browser Safari 12: 


    Almost all Mac users know about the Safari browser in Mac right. In the new version of MacOS, there is are some significant changes rolled out such as anti-advertising features and prohibiting cookies features. With these, there are many other options in safari which we can have a glance at them later.

    Disappointed Home Option: 


    MacOS has a new Home option. This apps working mainly depend on how many home kit appliances are there in your house. Sadly, most of us won't have those home kit ready appliances so it won't work better for some of us. Although we have home kit appliances, also it won't work properly as we have tested it. So, this feature turned out to be a sad feature for us.

    Final Verdict of MacOS Mojave Review: 


    If you are working freak who always like to work? Or if you are gaming lover who always loves playing means, you should definitely use this MacOS Mojave because its Dark Mode helps you a lot in protecting your eyes and also it won't trouble you while working for long hours on the computer.

    As its free and there is enough scope to download and use this MacOS. If you really strive to try Dark mode, then you have to use this version. There are also some hidden features which have slightly improved than the previous version. This makes most of the people to stay with new MacOS. Also, be aware of some things like some of the old version apps will not work in Mojave.

    Monday, October 15, 2018

    8 Best Accessories for Your New iPhone

    Best Accessories for Your New iPhone
    iPhones are known for the very many features that they have. The iPhone can do this and that….., is just the beginning of what an iPhone can do and for all that functionality there is a heavy price to pay too. But if you are still not satisfied with what your iPhone can do then here’s a list of 8 Best Accessories for your new iPhone.

    Ranging from cases to portable chargers, we’ve got you covered on this list of 8 best accessories for your new iPhone. This list is created so as to satisfy even the most hard- to- please- person- ever.

    Starting off this list of 8 Best iPhone Accessories withRAVPower Alpha Series Fast Charge Wireless Charging Pad: 


    Beginning this list of 8 best iPhone accessories with a wireless charging pad. This wireless charging pad is fit for iPhone 8 and above. The charging can take anywhere up to 2 and half hours for a full charge and it even comes with sensors that show what the current battery status is. The pad also has anti- skid so that you can rest assured your brand new iPhone won’t slide off while charging.

    This best iPhone accessory will cost you $40.

    Don’t lose your keys with Tile on this list of 8 best iPhone accessories: 


    Tile is an iPhone accessory that you attach as a key ring to your keys or any other thing that can’t afford to lose. It has Bluetooth and an associated app on the iPhone that can help you locate your lost keys without getting delayed to go for that meeting.

    Tile plays a tune to help you locate your lost article and has a range of up to 200 feet. This best iPhone accessory will cost you around $25.

    For the Outdoors- Nomad Rugged Cable on the list of 8 best iPhone Accessories: 


    If you’re an out doorsykinda person then this cable is for you. It is durable and dirt resistant with sealed caps to keep the dust a bay and can be used with iPhone 5 through 8.

    This rugged gadget will cost you $25.

    Kenu Stance Tripod on the list of 8 Best iPhone Accessories: 


    This tripod allows you to prop your iPhone in either landscape or portrait view. This cool gadget makes it great for hands free video conferencing and reading.

    The company has even tweaked the design a bit to make the tripod as a bottle opener too. This amazing gadget will cost you $20.

    Another one for the Adventurer in you- Rokform Pro Series Bike Mount and case: 


    This one doubles up as a bike stand and case for your iPhone as well. If you like taking your bike to various places then this gadget is the one for you. You just have to place the mount on the bike and attach the iPhone with its case onto it. You can then use your phone for hands- free travel. This costs $99.

    Belkin Lighthening Audio+ Charge Rockstar: 


    This gadget is for those who want the ability of charging and listening to music at the same time from their iPhones. This one is capable of supporting iPhone 7 and 8 and will cost you around $40.

    For Extra Storage the HooToo Flash Drive: 


    For extra storage why pay a premium when you can get this flash drive with a lightening connector on one end and a USB 3.0 port on the other and what’s more is that it comes with 32 GB of storage. This costs $40.

    DJ Mavic Air a drone on the list of 8 Bets iPhone Accessories: 


    This drone is can be controlled form your iPhone and can shoot videos in 4K plus it has a range of 2.5 miles and costs $800.

    Wednesday, October 10, 2018

    AirPods Accessories Worth Your While!

    AirPods

    AirPods Accessories Worth Your While!

    Since its release the Apple AirPods have been a real success. They make a welcome addition to any line up let alone Apple’s. Their simple white Apple signature look coupled with their charging case make them a must have for anyone. But what more can you want when you already have these AirPods at your disposal. Not much you would think. That is until now…

    To make your audio experience even more worth your while, here’s a list of Apple AirPods accessories that will liven up your Apple AirPods experience.

    Apple AirPods Accessories Numero One- Elago Wrist Fit Apple AirPods Silicone Strap:


    With this handy device you can store and access your Apple Airpods easily enough. This AirPods accessory is like nothing you’ve seen before. You can easily strap on your AirPods onto the slots provided in the band for easy storage.

    You can even latch on the AirPods holder onto the band which is compatible with most Apple Watch bands.

    Get fancy storage Apple AirPods Accessories with ColorWare Limited Custom AirPods Retro:


    This Apple AirPods case will take you right back to the 80s with its rainbow themed button and 80s vibe.

    This AirPods accessory has taken its inspiration from Apple Ile. Apple AirPods Retro is a cool blend of the old and the new and comes complete with faux vents to give you that 80s feel.

    This One is for all Apple devices including the AirPods- Elago Charging Hub 3 in 1 dock:


    Unlike all the Apple AirPods accessories on this list this one is for all the Apple devices out there. This Apple AirPods accessory is just a compact charging dock for all your fav Apple products and just above the Apple watch charger you have your self an Apple AirPods charger in the dock.

    So, in order to beat rush hour traffic in the mornings all you have to do is remember to grab your Apple AirPods from the dock so as not to miss out on your fav tunes.

    An AirPods case to go on the List of Best Apple AirPods Accessories- Twelve South Leather AirPods Case:


    Here is something fancy on the list of best Apple AirPods Accessories to own. The Twelve South leather case is made from full grain leather and all you have to do is slide your ear buds into the case and there you go. You have your self a fancy looking bag for just ear buds.

    Chargable Apple AirPods Case at your Disposal- Did I mention this one too is made of Leather:


    So, sticking with the leather theme here’s another AirPods accessory that fits the bill. It is made of leather, looks cool and you can charge your AirPods using it as well. There is no real need to move your AirPods into a case for charging.

    Get your AirBuds Charged with this Wireless Charging Case on the List of best AirPods Accessories:
    Since wireless charging is all the rage now, why not include wireless charging on our list of best Apple AirPods Accessories? Complete with its own case and wireless charging using Qi tech, this one is must have if you’re looking out for an AirPods accessory.